Horizontal Reinforcement Options for Minimizing Control Joints
Are you stuck in an empirical rut when it comes to locating control joints in your structural masonry walls? Control joints at 25 feet on center with standard joint reinforcement is typical for many engineering projects, however, some buildings warrant a closer look at minimizing the use of control joints in order to achieve a more efficient wall and a cost effective solution.
In August 2021, Sam Rubenzer, PE, SE, from FORSE Consulting, presented Movement Joints for Masonry – Structural Edition for SE University. Sam explored the role of masonry movement joints in structural masonry walls, as well as the movement properties of masonry materials and structural systems. He explained the purpose of joints, what to consider when locating them, and who is responsible for locating them according to the code.
During the presentation, Sam gave an example with 5 options for horizontal reinforcement for the same basic wall design using the NCMA TEK guides 10-2D and 10-3. Using both the empirical approach and an engineered approach, the following 5 options were presented as viable options: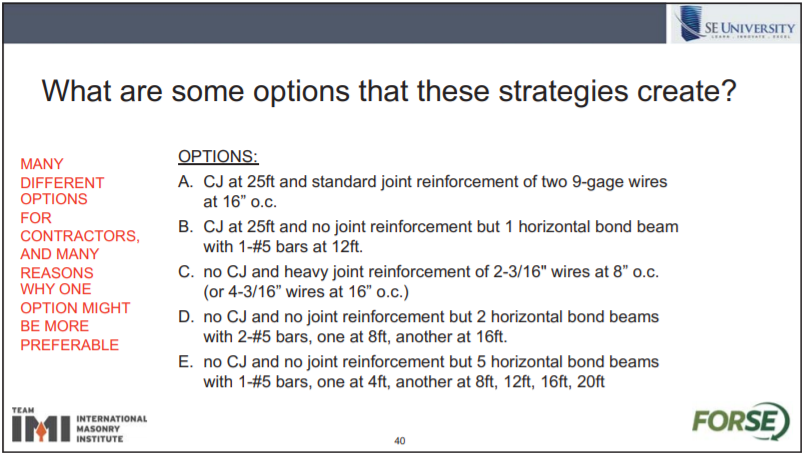
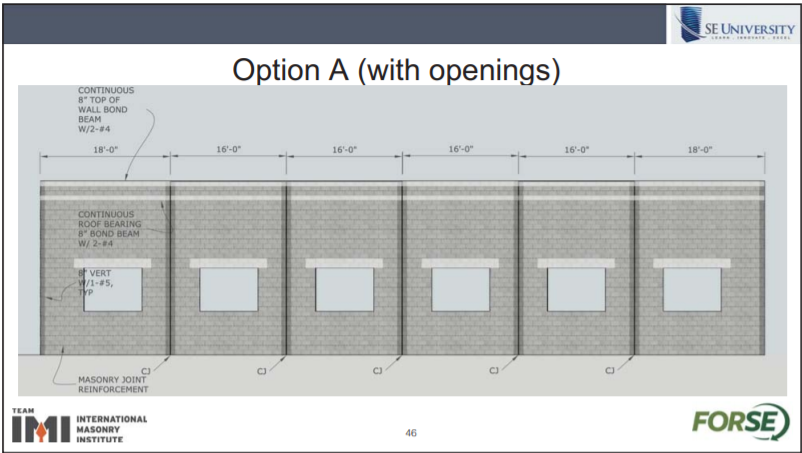
- Option A is a very commonly used empirical method for determining CJ spacing with typical joint reinforcement which most contractors would be very familiar with.
- Option B offers a similar CJ spacing while eliminating joint reinforcement in lieu of a single reinforced bond beam.
- Option C eliminates all control joints, but includes heavy joint reinforcement closely spaced.
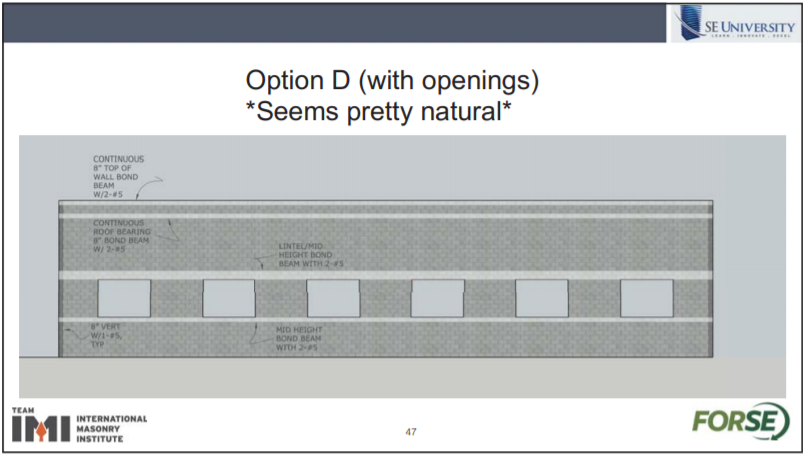
- Option D also has no CJs but includes 2 reinforced bond beams.
- Option E eliminates all CJs but includes 5 reinforced bond beams at various heights.
All of these options satisfy the need for horizontal reinforcement to control cracking for this basic structural masonry wall, however one option may be preferable over another depending on the contractor doing the work or the need for additional structural capacity of a longer shear wall with less control joints.
These additional options become even more beneficial when considering more complicated walls with openings. Walls with repeated large openings spaced closely together become less efficient with control joints located between each opening. Thus, a continuous reinforced bond beam makes more sense to eliminate the use of control joints between each opening. As you can see from these two slides, the second option makes good sense, and offers a wall with less overall maintenance costs and would most likely cost less to construct.
Control joints are certainly necessary in certain situations where stress concentrations are likely to accumulate such as corners, intersecting walls, or a wall with a change in height. However, in many cases, minimizing the number of control joints can produce a more cost efficient wall design that is easier to construct and maintain over the life of the structure.
There are no comments yet, but you can be the first